
 |
 |
 |
 |
 |
Day 1Day 1 started with an introduction to the facilities and the curriculum, plus a brief chalk talk. Before long, we headed out to the "Technique Oval", which is really a large rectangle with rounded corners. Half the group starts in the skid car, while the other half laps the Technique Oval in the Z3's. The oval is in the middle of a large asphalt surface - there is nothing to hit but cones (and a few light poles. ) After a break, the groups swap places. The Skid Car (described in The Cars) is pretty amazing. With the rear end light to simulate oversteer, you can break the rear end loose with about 1/2 throttle, and a little brake pressure will make the car feel like the rear is on ice. The skid car not only teaches and reinforces skid control and steering wheel handling, it also provides the instructors with their first opportunity to assess each student's abilities. Feedback both during and after the session is helpful and accurate; this sets a pattern for the days to come. In the Z3's, the first lapping session is done all in 3rd gear, to get the feel of trail braking and weight management. The Z3's are set up with very neutral handling, so they are easy to rotate when you turn in with some brake pressure. They are easy to over-rotate too. I managed a 450-degree spin when I pushed it just a little too far. But that is exactly what this class is for. Instructors occasionally flag a student into the pits to join them in the car. They will ride as passengers, as well as drive with the student observing. After lunch, all students lap in the Z3's again. This time, however, we are to use a heel-and-toe downshift to 2nd into Turn 1, continue trail braking to rotate the car, then accelerate through Turn 2 and onto the back straight and upshift to 3rd. Repeat for Turns 3 and 4. Corner entry speed was over 60 m.p.h. Lots of practice, building on the skills we learned in the morning. |
|
|
I actually did get a little of this on video. The first part of this video is my friend Andy's instructor driving, showing him the technique. The second part is me driving. If you watch the background you can get an idea for the speed; if you watch the key fob you can see the sudden and hard deceleration on initial braking. But the best thing is the sound!! Please right-click and "save as":
The bad news is that this is all the video you're going to get. I wanted to shoot more video, but it turned out to be a mechanical and logistical nightmare. The last session of the day was taught at a different section of the lot, and was a "driving school" style emergency lane change exercise. You roar down the center of a 3-lane course at successively higher speeds. When your car passes an electric eye, a computer turns either two or all of three overhead green lights 90 feet ahead to red. Your job is to swerve into the green lane, or stop the car if all three are red. At 40 m.p.h., you use up over half the distance just processing the lights and deciding on a course of action. Most of us succeeded at 35 m.p.h., but failed at 40. The obvious point was a reminder that your best-case reaction time is a constant - and faster speeds mean more distance covered before any evasive action is taken. So slow down and maintain greater following distances! This particular exercise, while obviously valuable to drivers who haven't had it before, was a little out of place in this course. Fortunately it was the exception to the rule; every other exercise was clearly pertinent to anyone interested in high-performance driving. |
|
Day 2 |
|
|
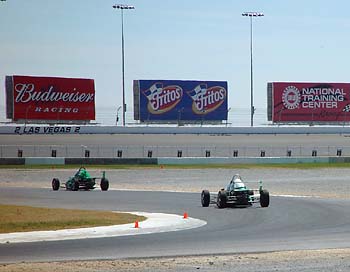
Click Map for a higher resolution version, suitable for printing. Days 2-4 are usually taught on this course. The red line shows the approximate race line. Critical sections include the braking/downshifting zone into Turn 1, and the Turn 3,4,5 complex. Here, you must sacrifice the corner-optimal line in 3 and 4 to ensure you can get on, and stay on the gas well before the Turn 5 apex. This gives you maximum speed heading for Turn 6, where you lift for a short moment, add throttle and turn in. You must squeeze on a good bit of throttle before the apex, and remain at full throttle all the way through 7 and into the braking zone of 8. Done properly, it is amazing - you are really moving, and you never touch the brake from between 4 and 5, and the entrance to 8. That is, if you get it right. It takes a lot of practice and some serious cojones to stay on the gas. You are almost constantly turning, and the car has more lateral grip under slight acceleration than it does under slight deceleration, which induces oversteer. So as the speeds climb, the cost of lifting increases. If you panic and lift after the entry to 6, you're likely going to go off the track at somewhere between 80 and 90 m.p.h. (in the F2000 cars.) The good news is that you get 3 days with multiple sessions per day to learn the track and work up slowly. |
|
| The day opened with a briefing and helmet selection, and then we drove our Z3's from the school offices to the Inside Road Course, about 1/2 mile away, on the roads that are part of the greater Las Vegas Motor Speedway property. The entrance to the track leads through one of three very narrow (one lane) steel-lined tunnels under the outer NASCAR oval. Of course, everyone sees the opportunity, backs off to open space from the car in front of them, and punches it all the way through the tunnel, which amplifies and echoes the exhaust note quite effectively. How childish. But boys will be boys, and this established another tradition we never failed to enjoy on the way in or out, every day. We parked the Z3's and hopped into the Academy van. One of the instructors took us out onto the course and showed us the line for the first time. The first lap in the van was slow, but was followed by more laps at successively higher speeds. Advice: don't take a middle seat - there is nothing to hold on to. By the last lap the instructor was driving the van fast. Smooth and very fast. |
Yours truly with the Z3 |
| Next we went out on the track with the Z3's and did a "lead-follow" exercise. Three students drive their Z3's behind the instructor showing the proper line. Each lap is faster until you're running at about 9/10ths. After a few laps, the instructor gives a "rotate" signal described in the morning's briefing. The first student pulls to the left and waves the others by, establishing a new "lead follower." Finally the instructors pulled off and we were free to continue lapping until the end of the 45 minute session.
The day continued with more of this. Another tradition is established: each day in the morning and after lunch we circle the course in the van or school 3 Series sedans with an instructor at the helm, reinforcing the line and appropriate techniques at each turn. Even on the fourth and final day, none of us felt that this was overkill - we all picked up more hints and tips each time out. In the afternoon's sessions the instructors rode along with us, they drove our cars with us as passengers, and we lapped solo. And we lapped and we lapped and we lapped. We put a lot of miles on the Z3's. By the end of the day, we were all considerably faster, and knew the braking, turn-in, apex and exit points for every turn pretty well. This is a good thing, because once we switched to the F2000 cars we would once again have our hands full with plenty of new challenges demanding our full attention. |
|
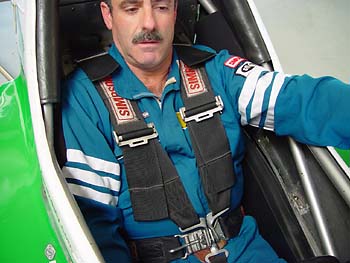
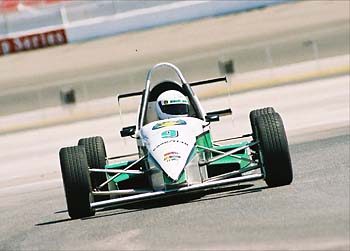
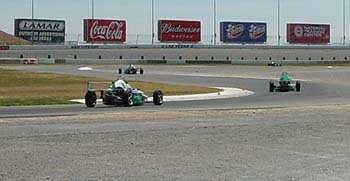
Day 3The day opened with a classroom briefing on the F cars - how to get in, start and operate them. We selected Simpson driving suits and shoes from a large assortment. These were provided free of charge. Oddly, we had to pay $5 a day if we wanted to use gloves. (I have never needed gloves before, but with 4 days of driving and shifting I did appreciate them in this class.) Given the small amount of space between the pedals, the shoes were a welcome replacement for our wide tennis shoe soles. Next we were introduced to our cars, each of which already had its pedal height and padding adjusted to fit our height and weight, which was supplied months earlier on the registration form. Additional fine tuning was made with extra pads. Getting into these cars, or rather, putting them on, takes some care and some good upper body strength. First, set the wheel, gloves and helmet on the cowl immediately in front of the cockpit, as you won't be able to reach anywhere else once you're in. Swing one foot over the side and on to the seat, don't step on the fragile side pods! Hands on the cockpit edges and swing the other foot in, being careful not to kick the side view mirrors, which would easily break off. This is a race car and it is built light. Supporting your weight with your arms, lower yourself in as you slide your feet forward. Fish out the 5 seat belt straps and latch them. Put the steering wheel on and give it a firm tug to be sure it won't give you any unwelcome surprises later. The seating position is a semi-reclined one. Your butt is about 2 inches off the pavement, your knees higher than your butt, your back reclined at about a 45 degree angle. Helmet on, gloves on, and wait while everyone else does the same, and the instructors mount up. Enjoy or curse the hot Las Vegas sun, and try to slow your racing heart back down. Finally we start the cars for the first time. They light right off, and the straight pipe emits a healthy, raspy exhaust note. Launching the car gives you the next clue that these cars are different. First gear is very tall - at 2000 RPM you're going 23 M.P.H.! Add to that a clutch pedal with a total of about 2 inches of travel - and you have a car that needs some finesse to launch. Needless to say, you must slip the clutch for quite a while to get the car up to a speed where it will keep running with the clutch out. Our first session on the track helped us get used to the cars. The gear ratios are very close, so there is more shifting than was needed in the Z3's. Most of the course is taken in 2nd and 3rd, with a brief stint in 4th at the end of the front straight. It takes some time to get comfortable with the "crash box" transmission, but it is not difficult. Upshifts are done without the clutch - as fast as you can lift and replant your throttle foot, you flick the lever through its extremely short, 1-2 inch throw from one gear to the next (standard H pattern)- the shift is virtually instantaneous. The instructors suggested we use the clutch on downshifts, but with an appropriate throttle blip and good timing we find we don't need it. The reward for properly executing a 4-3-2 downshift under heel-and-toe, progressing from threshold to trail braking in Turn 1, is not only better lap times, but also a great deal of satisfaction and some wonderful sounds. Wahoo! On my first laps, I had some trouble shifting - 2nd gear is very tall, and the throws are so short you can easily forget what gear you're in. Looking at the shift lever is no help - the throws are too short. I caught myself a couple of times looking at the lever, thinking I was in 3rd, and unable to move the lever back to 2nd. Turned out, having caught some slower traffic, I had never shifted out of 2nd! I started saying what gear I was in out loud when I shifted - within a few laps I no longer needed this crutch. Passing was allowed on the straight between Turn 9 and Turn 1, but only with a signal from the driver ahead. Because the engines are solidly mounted to the chassis, the rear view mirrors vibrate like a Yugo on 3 cylinders, making it very difficult to see a car behind you until they are close. At best you'll see a green and white blur. However the instructors were always watching, and if another driver was holding you up, they would wave the passing flag at him. The students in our group were always good at letting a faster car by once they knew he was there. Instructors can't ride in these cars with the student of course, but they alternate between parking at various places to watch us, and following us in their own F2000's on the track. After each session, there is specific feedback for each driver. It is always accurate and helpful, good natured and not condescending in the least. |
The Office
A tight, well-supported fit
Left Into 4 - Looking ahead to the apex...
And tracking out |
|
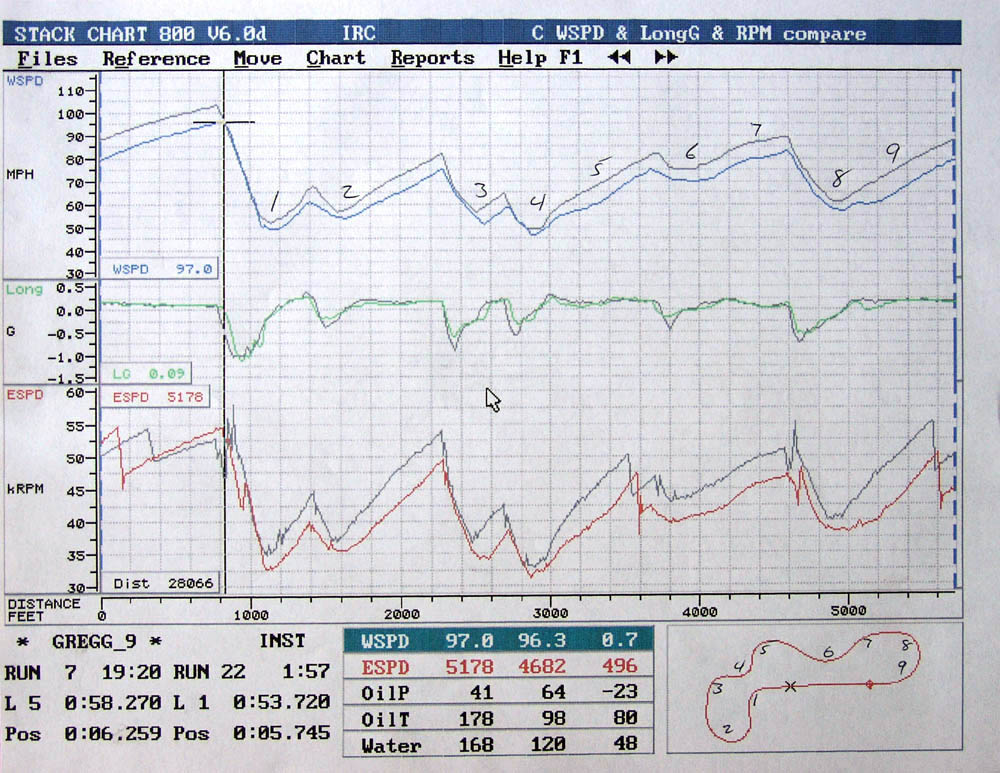
After lunch we enjoyed the ritual ride-around track review, followed by 2 more lapping sessions. This time, data was downloaded from the cars when we pulled into the track garage, and reviewed with us. This is amazing - we could see how our speeds, braking points, shifting and throttle smoothness compare to a "good lap" previously recorded by an instructor. With this feedback, we all improved on the next session, as evidenced by the data. We reviewed the data on the computers, which allowed us to compare any lap to any other (of our own, an instructor's or a fellow student's.) The software also allows you to zoom in on a section, or measure the time lost from any point to another compared to the instructor's lap. It takes some time to understand the charts. First, as shown in the lower left hand section, this chart compares two laps - my 58.2 second lap to the instructor's 53.7 second lap. The block in the middle with the blue bar shows maximum wheel speed, engine speed, oil pressure oil temperature and water temp for the lap, with the last column showing the difference between my data and the instructor's. In the main part of the chart there are 3 pairs of lines. In each case, the black line corresponds to the instructor's lap, and the colored lines correspond to mine. When viewed on the PC, you can move a cursor from left to right and the little "x" on the track map in the lower right corner moves to show the corresponding track location. On this printout, you can see the cursor, a vertical black bar, right at the beginning of the braking zone for Turn 1. The top pair of lines show speed in miles per hour. The instructor has written the turn numbers above these for clarity. This was a pretty good lap for me - only 2 out of the 6 students broke 1 minute the first day. A good example of feedback is seen at Turn 3. I over-slowed and began accelerating later than the instructor. Using the computer he was able to tell me that was good for a half a second. The second pair of lines shows longitudinal acceleration - useful in determining whether you're braking hard enough, too hard, or perhaps reducing brake pressure as you downshift with heel-and-toe. The bottom pair of lines shows engine RPM, which shows speed, gear selection, and shifting performance. You can see the throttle blips for the 4-3 and 3-2 downshifts just to the right of the vertical black cursor - corresponding to the braking from 95-100 m.p.h down to 50 m.p.h. for Turn 1. Pretty cool, eh? We were thankful we had already learned the course in the Z3's on Day 2. This allowed us to focus more on mastering the F2000's specific demands and behaviors. By the end of the day, my lap times had already gone under 1 minute, and I felt great. We all had so much adrenaline we were not only driving at 100 m.p.h., we continued to talk at that speed as well. |
A sample printout from one of my laps
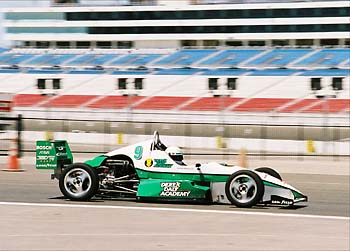
Approaching 100mph on the Front Straight |
Day 4We had a quick briefing session in the classroom while we got into our driving suits. The instructors explained the rules and signals for the morning's agenda, which included passing and SCCA-style rolling race start exercises. The passing drill started with 3 students behind an instructor. After a couple warm up laps, and at about 8/10th's speed, the instructor signaled and the lead student moved left on the straight so that both cars entered the braking zone at Turn 1 side by side. The inside car owns the line and completes the pass. On the next lap, this was reversed, with the instructor passing the student. This was repeated for 3 more exchanges, ending at closer to 9/10th's speed. This left the student ahead of the instructor to lap freely for the remainder of the session, while the other two students went through the exercise. Then gridding/starting practice required us to follow each other single file, and then grid in a 2-wide pattern, lead car on the left. We proceeded around in this formation at 3000 RPM in 1st (about 35 m.p.h.) until we were all on the front straight. The instructor would then wave the green flag, and we flew down into Turn 1, typically with 2 cars side by side. The "finish line" was declared to be the turn-in cone for Turn 1, but of course if a pass wasn't completed by then, it was carried through the turn, we all slowed, and then repeated this procedure for several starts. If you passed someone, your position on the grid changed, making it a bit more interesting. Back to the paddock for some feedback, then break for lunch. For our final afternoon we had 3 more lapping sessions in the F2000, with data acquisition and analysis after each. Once again, the instructors provided really valuable feedback, not just from the data but from their visual observations as well. By this time we were all both faster and more consistent than we had been, and I felt like I had really learned a lot. Although I was tired, I really didn't want it to end. We drove the cars back through the tunnel for one last aural assault, and parked them for the last time at the office. We turned our helmets and suits back in, took a short written test (part of the SCCA licensing requirements), reviewed them and received our diplomas. We thanked our instructors, said goodbye to our new friends, and left, exhausted and very, very happy. |
Straighten, Lift, Turn in, Throttle on...
... Nail the apex of Turn 6 at 70 m.p.h....
...Stay on the gas! 80 m.p.h. at Turn 7, and 90+ into Turn 8. |
|
|
|

|
|
|
|
|